Training Videos
If this is your first time writing an insect fact sheet for the extension entomology website, you may consider watching the two-part training series on getting started. In total, the training should take less than 20-minutes and covers publishing either using WordPress or the Microsoft Word Template. Part I of the series is a general “Getting started” training. For Part II, select the platform you anticipate using for publishing your fact sheets; IIa for WordPress or IIb for Microsoft Word Template. If you’re unsure, please select option IIb.
Outline:
Welcome to the insect fact sheet authoring page. This page will provide all the information you need to publish insect fact sheets on our extension entomology website. Please follow the guidelines in this page closely to prevent delays. Please refer back to this page any time you’re writing a fact sheet, as instructions may get updated to address recurring challenges over time.
First Step(s):
- Find an insect you’d like to write about:
- Check the Google Sheet for an insect you’d like to write about. If no one has claimed it, add your name as the author and date of “sign up”. If the insect is not listed, add it to the bottom of the list.
- You can “reserve” up to three insects at a time and have 3 months to complete them.
- Double check the insect fact sheet hasn’t already been published on our website: Current Insect List
- Disclaimer: Fact sheet selections can be over-ruled by Dept. or Associate Department head if controversial (e.g. Asian Giant Hornet)
General Guidelines
Writing Style
These fact sheets are intended for general audiences. Refrain from using scientific jargon or technical terminology; further detail should be referred to in the additional resources section. Additionally, the content in these fact sheets should be relatively timeless. For this reason, content such as specific insecticide active ingredients or distributions of new invasives should be avoided. In the case of new invasives, you may choose to include information about its original distribution and can embed a distribution map from elsewhere (with permission, for example, EDDMaps.org).
Images
- Ensure we have rights to the image, such as written consent to use, creative commons, or fair usage described on the originators website.
- Two sources to consider:
- AgriLife SmugMug Photo Library (Ask Dr. Pat Porter for password)
- Bugwood images
- Images should be JPG or PNG and be of decent quality (i.e. at least 800 x 640 pixels and in focus).
- Include full citation for the image, even if it’s your photo.
- Remove any text/annotations from the image itself, unless they are labeling specific features of an insect. Featured images should never contain annotations on the image itself.
Featured Image
- Should be a good diagnostic photo of the insect; people will be scrolling through the images of insect fact sheets looking for their specimen.
- Featured images should be square.
Content Body Images
- Refrain from adding images near the top of the fact sheet; the featured image will already occupy that space.
References/Citations
- Any information that is not common knowledge needs a citation. Provide in-text citations and full reference list at the end of the document. For the sake of uniformity, consider following the citation style for journals submitted to Entomological Society of America.
Management Section
- Insect fact sheets have a “Management” section. The purpose of this section is to provide general management strategies, not specific ones. More specifically, it’s important that the information in the management section be relatively timeless; thus, specific active ingredients or trade names of pesticides should not be used. Refer to a Management Guide or Publication for specific management recommendations.
- Specific exceptions are allowed for the no-insecticide rule; however, if insecticide information is included, be sure to check off the “Time-sensitive Info” box under the Management section (in WordPress, will appear after content has been written under Management”.
Insect fact sheets can be authored using one of two tools: WordPress or Microsoft Word Template. WordPress is the web content management tool used to build the extension entomology website. By authoring fact sheets directly in WordPress, you save others from having to move content from Microsoft Word into WordPress for you. However, WordPress requires some additional training and may not be intuitive for everyone. For this reason, authors publishing directly into WordPress require additional training before they are provided access to publish directly on the site. The Microsoft Word Template, on the other hand, offers a quick convenient way for authors to start producing content. Select your tool of interest below:
WordPress Instructions Microsoft Word TemplateWordPress
Ensure all required fields are completed.
General
- Log in to the WordPress site, extensionentomology.tamu.edu/wp-login.php
- On the left sidebar, hover your mouse over “Insects” and click “Add New”.
Right Sidebar
- Insect location(s) checked where insect is commonly found
- Insect common names, with ESA-approved or most commonly used common names listed first
- Insect Scientific name (binomial latin, with or without author)
- Featured Image
Images
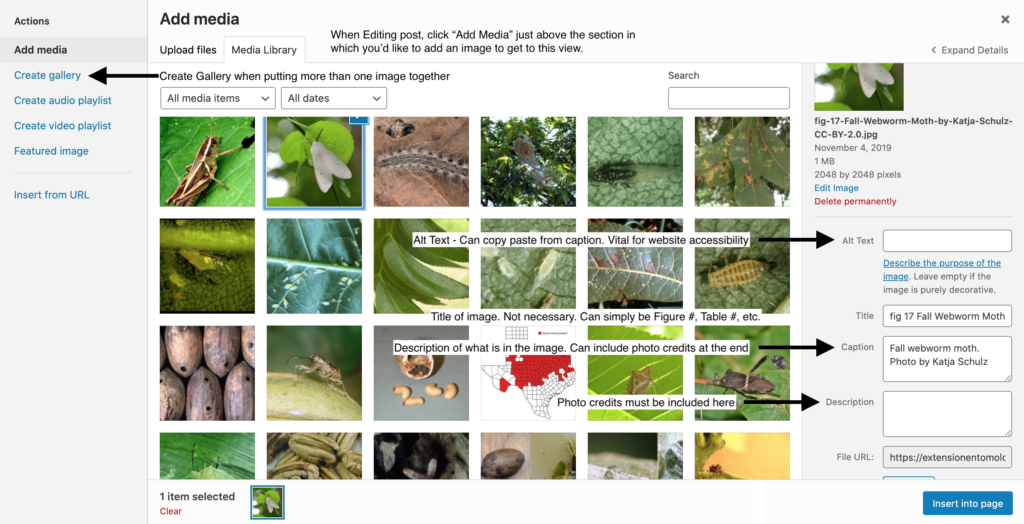
- “Title” for an image is unnecessary – if included, should be brief, such as Figure # or Table #. Example.
- Full annotation of image should be provided in the image “Caption”. Example.
- Full citation should be included in the “Description”. Example.
- Refrain from adding images near the top of the post. Example.
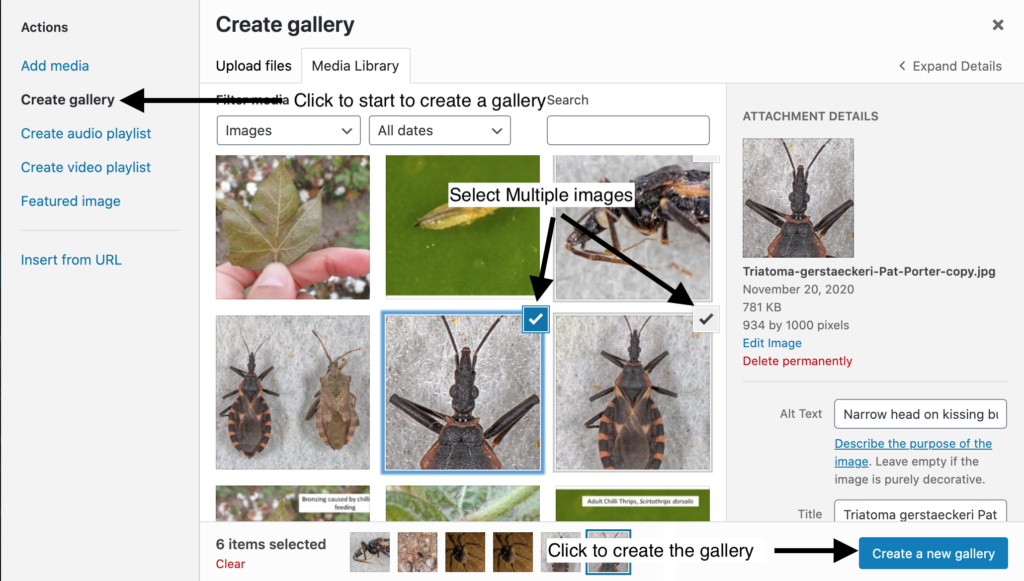
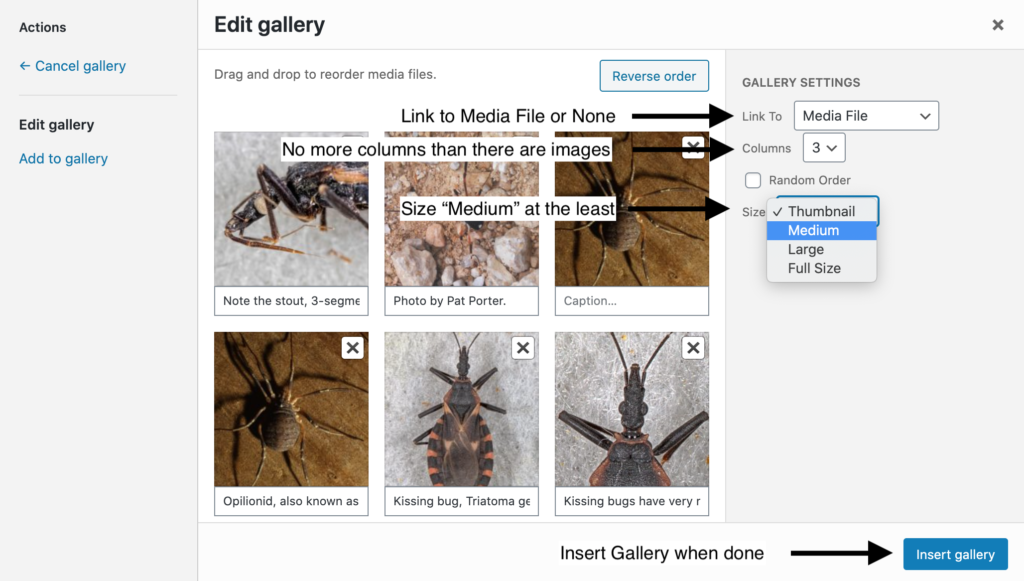
- When two or more images are placed adjacent to each other, always put them in as a “Gallery”. See below for instructions:
Main Content
- Insect Title (Single common name)
- Shortcode displayed in main body (Note: Your content will not display until you copy-paste the following into the main body of the post): [[su_insect_shortcode]]
- Original author(s)
- Select Insect Order
- General “Description”
- Consolidate short sections that only have one or two sentences.
- Remove any trailing spaces at the end of any sections. Example.
- When complete, ensure Has at least two reviewers; change status of post to “Needs Review” (near bottom), hit “Publish” (very top right), and send URL to reviewers to provide comment through email, Word, etc.
- After incorporating suggestions from reviewers, change status of post to “Complete”.
- Update the Google Sheet with the list of insect fact sheets.
Other Web Best Practices
Some other tips will be included here over time.
Microsoft Word Template
Word Factsheet Template
- Download the insect fact sheet template (above).
- Fill out the template.
- Submit to two reviewers (add their names to the end of the document).
- Make revisions as needed.
- Send completed and revised document to erfanv@tamu.edu.
- Update the Google Sheet with the list of insect fact sheets.


